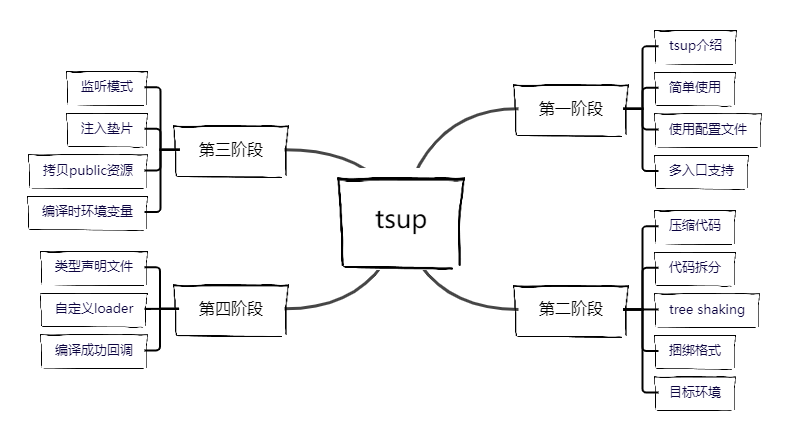
tsup 是一个基于 ESBuild 实现在零配置的情况下快速捆绑 Typescript 模块的项目,在构建 CLI类 项目时可以优先考虑采用。

在这一节中你将了解简单上手案例、配置文件的使用以及多入口如何配置等内容,准别好我们就要开始学习 tsup 了。
1. 介绍 tsup:
tsup 是一个基于 ESBuild 实现在零配置的情况下快速捆绑 Typescript 模块的项目,支持 Node.js 应用中的任何内容,如:.js、.json、.mjs,及 Typescript 中的 .ts、.tsx,还包括实验性的CSS。但在由于部分功能 esbuild 存在天然的不足,但又是开发者密切关注的功能,tsup 同时也选择融合其他的构建工具共同参与,这些内容会在后续的小节说明。
2. 简单使用:
通过一个简单的示例来演示 tsup 零配置编译代码的快捷性;
2.1 准备案例代码
这里使用 esbuild 文档中的一块案例源码:
import * as React from 'react'
import * as Server from 'react-dom/server'

let Greet = () => <h1>Hello, world!</h1>
console.log(Server.renderToString(<Greet />))
import * as React from 'react'
import * as Server from 'react-dom/server'
let Greet = () => <h1>Hello, world!</h1>
console.log(Server.renderToString(<Greet />))2.2 安装必要的依赖项:
npm i react react-dom
npm i @types/react @types/react-dom -D
npm i react react-dom
npm i @types/react @types/react-dom -D2.3 运行 tsup 编译:
cd code01 && npx tsup index.tsxcd code01 && npx tsup index.tsx仅仅需要在 tsup 命令后紧跟需要编译的文件名即可启动编译,默认输出到当前目录下的 dist 文件夹中,在此次编译结束后通过 node dist/index.js 执行输出的文件可以正常在终端看到 <h1>Hello, world!</h1> 内容。
PS:代码参照1024Code中的code01部分;
3. 使用配置文件:
虽说 tsup 宣传零配置下工作,但是在实际的项目开发中还是需要使用配置文件进行更细粒度的定制,tsup 支持在 package.json 中增加 tsup 相关属性进行配置,也提供独立配置文件的方式进行配置,一起来看一下吧。
3.1 使用配置文件进行配置:
- 配置文件命名格式:
tsup.config[.js、.ts、.cjs、.json];
下面尝试使用 .ts 后缀的配置文件,在下面的配置文件中指定了编译模块的入口、开启生成源码映射文件和开启编译清理选项:
import { defineConfig } from 'tsup'

export default defineConfig({
  entry: ['index.tsx'],
  sourcemap: true,
  clean: true,
})
import { defineConfig } from 'tsup'
export default defineConfig({
entry: ['index.tsx'],
sourcemap: true,
clean: true,
})配置好后运行下面的编译命令:
cd code02 && npx tsupcd code02 && npx tsup这次运行 tsup 命令编译就没有紧跟需要编译的文件名了,在编译结束后再次运行 node dist/index.js 仍然可以在终端看到输出了 <h1>Hello, world!</h1> 内容。
PS:代码参照1024Code中的code02部分,需要安装 tsup 模块:npm i tsup -D;
3.2 使用配置文件 + 终端命令动态配置:
仅使用配置文件仍旧是相对古板的,尤其是 json 格式的配置文件,但是在 js 或 ts 格式的配置文件中可以通过传入不同的选项动态调整配置,不同的选项通过终端指定参数控制,这样就达到动态控制少部分配置,静态控制大部分配置的目的;
将上面的配置进行改造,通过函数的方式返回一个配置对象,其它地方均不变:
import { defineConfig } from 'tsup'

export default defineConfig((options) => {
  return {
    entry: ['index.ts'],
    sourcemap: options.sourcemap,
    clean: true,
  }
})
import { defineConfig } from 'tsup'
export default defineConfig((options) => {
return {
entry: ['index.ts'],
sourcemap: options.sourcemap,
clean: true,
}
})这次运行 tsup 编译稍有变化,需要指定是否开启 sourcemap 选项,未开启时将仅输出 .js 文件,开启后将同时输出一个新的 .js.map 文件:
cd code02

# 关闭
npx tsup

# 开启
npx tsup --sourcemap
cd code02
# 关闭
npx tsup
# 开启
npx tsup --sourcemap3.3 在 package.json 中配置:
个人不太推荐这种配置方式,对于较大的项目来说,将配置全部放置到 package.json 会造成阅读和维护的困难(相对于单文件配置),下面的案例仅供参考:
{
  "tsup": {
    "entry": ["index.ts"],
    "splitting": false,
    "sourcemap": true,
    "clean": true
  },
  "scripts": {
    "build": "tsup"
  }
}
{
"tsup": {
"entry": ["index.ts"],
"splitting": false,
"sourcemap": true,
"clean": true
},
"scripts": {
"build": "tsup"
}
}4. 多入口配置:
在了解了 tsup 的配置文件后,补充一下各个构建工具均支持的多入口编译配置的方式,各个构建工具大致相同:
- 使用终端命令执行时通过位置列出每一个入口文件:
npx tsup index1.ts index2.ts ...npx tsup index1.ts index2.ts ...- 使用终端命令执行时通过内置的 --entry 标志来指定入口文件:
npx tsup --entry index1.ts --entry index2.ts ..npx tsup --entry index1.ts --entry index2.ts ..- 使用配置文件标记所有入口,支持对象和数组两种模式:
// 数组模式
export default defineConfig({
	entry: ['index1.ts', 'index2.ts', ...],
})

// 对象模式
export default defineConfig({
    entry: {
      m1: 'index1.ts',
      m2: 'index2.ts',
      ...
    },
})
// 数组模式
export default defineConfig({
entry: ['index1.ts', 'index2.ts', ...],
})
// 对象模式
export default defineConfig({
entry: {
m1: 'index1.ts',
m2: 'index2.ts',
...
},
})总结
这一节的内容就到此结束了,那么你知道 tsup 能干什么了吗?配置文件是不是可以自由利用了?多入口编译在如同组件库分包编译时就会用到,你还能想到 tsup 的什么应用场景呢?
 爱学习IT200.cn