tsup 是一个基于 ESBuild 实现在零配置的情况下快速捆绑 Typescript 模块的项目,在构建 CLI类 项目时可以优先考虑采用。

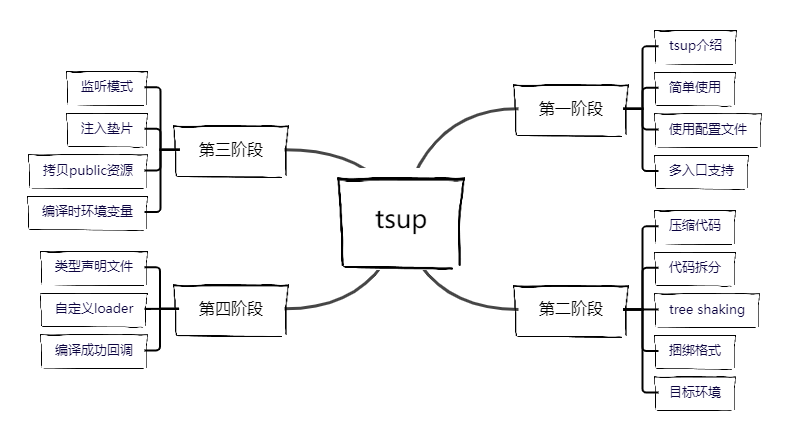
在这一节中你将了解 tsup 中一些较为高级的用法,如:监听模式的使用及规则、垫片的注入、资产目录拷贝以及编译时环境变量的控制。
1. 监听模式
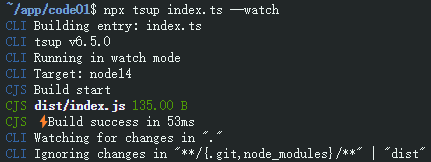
监听模式可以通过一次启动后持续监听源码的变化,实时进行编译,在各个构建工具中都是必要的一个功能。在默认情况下 tsup 将排除项目中的 dist、node_modules & .git 目录,因为这些目录都不属于我们自己开发的源码。如果你还使用到了一些并不需要编译的目录中的文件,那么可以通过 --ignore-watch 进行标记,这样 tsup 将不监听被标记的文件夹的内容。
- 启用监听模式:
cd code01 && npx tsup index.ts --watchcd code01 && npx tsup index.ts --watch
- 忽略不需要监听的文件夹:
cd code01 && npx tsup index.ts --watch --ignore-watch assets --ignore-watch publiccd code01 && npx tsup index.ts --watch --ignore-watch assets --ignore-watch public
PS:通过终端提示已经成功开启监听模式,并且新增的忽略文件夹也已经被读取到,这样每次源码变动后dist目录中的内容将保持实时编译的结果了。代码参照1024Code中的code01部分;
2. 注入垫片
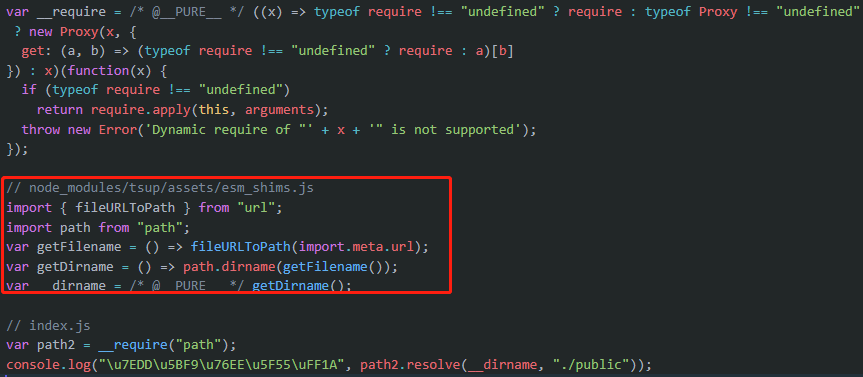
这里的注入垫片并非是语法降级时的处理,而是需要抹平 cjs 和 mjs 两种模块化方案中不同实现,比如说在读取文件前要获取文件路径,那么在 cjs 中就需要用到 __dirname 而 mjs 则需要用到 i,在不开启注入垫片时编译后的代码将无法正常工作。
开启注入垫片方式:
npx tsup index.js --format esm --shims

// or

import { defineConfig } from 'tsup'

export default defineConfig({
  shims: true,
})
npx tsup index.js --format esm --shims
// or
import { defineConfig } from 'tsup'
export default defineConfig({
shims: true,
})未开启垫片注入:

已开启垫片注入:

PS:代码参照1024Code中的code02部分;
3. 拷贝资产目录
对于项目中不需要参与编译及处理的文件通过统一管理的方式在源码编译后 copy 到 dist 文件夹中与其它编译结果共同组合成完整可运行的项目。
- 运行编译命令:
cd code03 && npx tsup index.ts --publicDir ./publiccd code03 && npx tsup index.ts --publicDir ./public- 编译前目录结构
code03
├─ public
│  └─ index.html
└─ index.ts
code03
├─ public
│ └─ index.html
└─ index.ts- 编译后目录结构
code03
├─ dist
│  ├─ dist
│  │  ├─ index.html
│  │  └─ index.js
├─ public
│  └─ index.html
└─ index.ts
code03
├─ dist
│ ├─ dist
│ │ ├─ index.html
│ │ └─ index.js
├─ public
│ └─ index.html
└─ index.ts- 预览结果
cd dist && npx serve -p 8080cd dist && npx serve -p 8080PS:代码参照1024Code中的code03部分;
4. 编译时环境变量
在编译时通过环境变量来控制不同方案的编译选项,还以已压缩代码的示例来操作:
配置文件:
import { defineConfig } from 'tsup'

export default defineConfig((options) => {
  const { NODE_ENV } = options.env;
  return {
    entry: ["index.tsx"],
  	minify: NODE_ENV === 'production',
  }
})
import { defineConfig } from 'tsup'
export default defineConfig((options) => {
const { NODE_ENV } = options.env;
return {
entry: ["index.tsx"],
minify: NODE_ENV === 'production',
}
})在终端指定环境标识
cd code04 && npx tsup --env.NODE_ENV productioncd code04 && npx tsup --env.NODE_ENV productionPS:代码参照1024Code中的code04部分;
总结
这一节的内容就到此结束了,源码及一些简单的配置就不贴了,可以访问每个小节给出的地址查看,tsup 还剩最后一点知识就基本结束了,下一小节见~
 爱学习IT200.cn