LogicFlow 是一款流程图编辑框架,提供了一系列流程图交互、编辑所必需的功能和灵活的节点自定义、插件等拓展机制。LogicFlow支持前端研发自定义开发各种逻辑编排场景,如流程图、ER图、BPMN流程等。在工作审批配置、机器人逻辑编排、无代码平台流程配置都有较好的应用。
这一节将讲解快速上手 LogicFlow 流程图编辑框架的自定义业务节点内容,代码要在上一节的基础上进行开发,使用1024code在线编写代码的小伙伴可以直接fork上一节的代码开始,这一节的大致内容包括了,准备自定义业务节点的模板、注册和使用、自定义样式、自定义形状、自定义外观几个方面,做好准备后我们就开始了。
1. 认识自定义业务节点模板:
LF框架自定义业务节点使用到了面向对象中继承的概念,通过继承LF提供的 XxxNode 和 XxxNodeModel 类后对相关的函数进行重写,并在默认导出时提供 type、view 和 model`;
下面这段代码继承了Rect相关的 RectNode 和 RectNodeModel,如果要继承其他的内置对象还请查看官方文档或源码:
// 源码位置:./src/CustomNode.ts
import { RectNode, RectNodeModel } from "@logicflow/core";

class CustomNodeView extends RectNode {

}

class CustomNodeModel extends RectNodeModel {

}

export default {
    type: "CustomNode",
    view: CustomNodeView,
    model: CustomNodeModel,
}
// 源码位置:./src/CustomNode.ts
import { RectNode, RectNodeModel } from "@logicflow/core";
class CustomNodeView extends RectNode {
}
class CustomNodeModel extends RectNodeModel {
}
export default {
type: "CustomNode",
view: CustomNodeView,
model: CustomNodeModel,
}2. 优先进行注册和使用:
自定义业务模板准备好以后就可以先进行注册和使用了,第一个是因为在继承内置类后虽然没有进行任何的函数重写但是不耽误渲染结果;第二个是因为一开始并不熟悉,所以要及时注册和使用起来看到效果,也是方便后续的自定义。
2.1 注册自定义业务节点:
注册过程主要分两个步骤:
- 第一要将上面编写的
CustomNode.ts导入到App.vue; - 第二要将
CustomNode对象通过lf实例中的register()函数在render()前注册;
// 导入自定义节点
import CustomNode from "./CustomNode";

const graphData = {}
...

onMounted(() => {
  // 在执行render前进行注册
  lf.value.register(CustomNode);
  lf.value.render(graphData);
})
// 导入自定义节点
import CustomNode from "./CustomNode";
const graphData = {}
...
onMounted(() => {
// 在执行render前进行注册
lf.value.register(CustomNode);
lf.value.render(graphData);
})2.2 如何使用自定义业务节点:
在成功注册后即可通过 render 函数来渲染业务流程中的一切元素的数据,自定义的业务节点和内置的默认节点使用方式相同,都是通过 type 选项来标识;
// 定义graphData
// 数据中的type为自定义节点导出的type属性的值
// 将节点在坐标为(100,100)的位置显示
const graphData = {
  nodes: [
    {
      id: 'fba7fc7b-83a8-4edd-b4be-21f694a5d490',
      type: 'CustomNode',
      x: 100,
      y: 100
    }
  ]
}
// 定义graphData
// 数据中的type为自定义节点导出的type属性的值
// 将节点在坐标为(100,100)的位置显示
const graphData = {
nodes: [
{
id: 'fba7fc7b-83a8-4edd-b4be-21f694a5d490',
type: 'CustomNode',
x: 100,
y: 100
}
]
}3. 自定义业务节点样式:
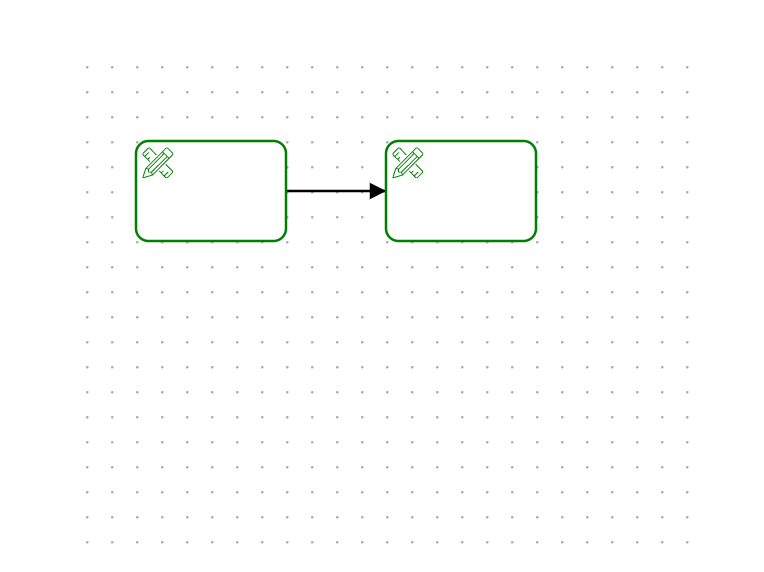
自定义业务节点样式(绿色描边),需要重写 RectNodeModel 类中的 getNodeStyle() 函数,通过关键词 super 获取到父类中的节点样式,并改变 stroke 的值为绿色,最后将修改完成的 style 返回;
class CustomNodeModel extends RectNodeModel {

  getNodeStyle() {
  	const style = super.getNodeStyle();
  	style.stroke = 'green';
  	return style;
	}
}
class CustomNodeModel extends RectNodeModel {
getNodeStyle() {
const style = super.getNodeStyle();
style.stroke = 'green';
return style;
}
}4. 自定义业务节点形状:
自定义业务节点形状(圆角矩形)和自定义业务节点样式一样的简单,重写RectNodeModel类中的initNodeData(data: any)函数就可以了;
class CustomNodeModel extends RectNodeModel {

  initNodeData(data: any): void {
    super.initNodeData(data);
    this.width = 120;
    this.height = 80;
    this.radius = 10;
  }
}
class CustomNodeModel extends RectNodeModel {
initNodeData(data: any): void {
super.initNodeData(data);
this.width = 120;
this.height = 80;
this.radius = 10;
}
}5. 自定义业务节点外观:
前面的自定义业务节点样式和形状都是在原有内置对象的基础上进行属性的调整,为了实习更高的自定义的外观,需要用到类似 Vue 中的 h 函数(渲染函数),通过重写 RectNode 中的 Shape() 并借助渲染函数实现外观的自定义;
- 第一步:重写
getShape函数,获取props中存储的当前节点的信息,如位置、尺寸和样式等; - 第二步:节点的外观要基于
SVG实现,下面的案例要在业务组件左上角显示一个ICON,ICON可以从iconfont找一个自己喜欢的;
class CustomNodeView extends RectNode {

  getShape() {
      // 获取XxxNodeModel中定义的形状属性
      const { model } = this.props;
      const { x, y, width, height, radius } = model;
      // 获取XxxNodeModel中定义的样式属性
      const style = model.getNodeStyle();

      return h('g', {}, [
          h('rect', {
              ...style,
              x: x - width / 2,
              y: y - height / 2,
              width,
              height,
              rx: radius,
              ry: radius,
          })
          h('svg', {
              x: x - width / 2 + 5,
              y: y - height / 2 + 5,
              width: 25,
              height: 25,
              viewBox: "0 0 1028 1024",
          }, [
              h('path', {
                  fill: style.stroke,
                  d: "<icon-svg-data>",
              })
          ])
      ]);
  }
}
class CustomNodeView extends RectNode {
getShape() {
// 获取XxxNodeModel中定义的形状属性
const { model } = this.props;
const { x, y, width, height, radius } = model;
// 获取XxxNodeModel中定义的样式属性
const style = model.getNodeStyle();
return h('g', {}, [
h('rect', {
...style,
x: x - width / 2,
y: y - height / 2,
width,
height,
rx: radius,
ry: radius,
})
h('svg', {
x: x - width / 2 + 5,
y: y - height / 2 + 5,
width: 25,
height: 25,
viewBox: "0 0 1028 1024",
}, [
h('path', {
fill: style.stroke,
d: "<icon-svg-data>",
})
])
]);
}
}6. 重启项目预览效果:
至此自定义业务节点基本完成,这种样式也是大多数流程管理系统中常见的一种风格,接着补充一下 graphData 数据,来看一下最终的效果~
const graphData = {
  nodes: [
    {
      id: 'fba7fc7b-83a8-4edd-b4be-21f694a5d490',
      type: 'CustomNode',
      x: 100,
      y: 100
    },
    {
      id: '681035e6-11e3-43d7-9392-1deed852c01a',
      type: 'CustomNode',
      x: 300,
      y: 100
    }
  ],
  edges: [
    {
      sourceNodeId: 'fba7fc7b-83a8-4edd-b4be-21f694a5d490',
      targetNodeId: '681035e6-11e3-43d7-9392-1deed852c01a',
      type: 'polyline'
    }
  ]
}
const graphData = {
nodes: [
{
id: 'fba7fc7b-83a8-4edd-b4be-21f694a5d490',
type: 'CustomNode',
x: 100,
y: 100
},
{
id: '681035e6-11e3-43d7-9392-1deed852c01a',
type: 'CustomNode',
x: 300,
y: 100
}
],
edges: [
{
sourceNodeId: 'fba7fc7b-83a8-4edd-b4be-21f694a5d490',
targetNodeId: '681035e6-11e3-43d7-9392-1deed852c01a',
type: 'polyline'
}
]
}
总结
这一节的内容就到此结束了,自定义业务节点的样式、形状和外观都搞定了吗?尤其是外观的自定义需要渲染 SVG 标签,所以掌握一些 SVG 相关的数据或掌握使用工具的生成 SVG 数据还是很有必要的,感觉把这一节的代码熟悉熟悉,接着要对 LF中的 Edge 进行自定义了。
 爱学习IT200.cn