开发 Babel 插件可以试试这个 CLI 工具
TIP
🎄Hi~ 大家好,我是小鑫同学,资深 IT 从业者,InfoQ 的签约作者,擅长前端开发并在这一领域有多年的经验,致力于分享我在技术方面的见解和心得
在上一篇【入门】你连Babel都不会配?那插件不成乱装了中讲述了 babel 的使用和插件/预设的配置,这一篇我想写写 Babel 插件开发的学习过程,在翻找资料的时候发现的这个可能已经过时的 CLI 工具, 那么就跟随我来快速搞定第一个 Babel 插件吧~
2. 环境/资料准备?
2.1 必备工具:
- babel-plugin-2:插件开发套件(fork自generator-babel-plugin);
- AST Explorer:抽象语法树在线分析;
2.2 学习资料:
3. 第一个 Babel 插件:
对代码块中 console 在执行时可以输出所在的代码行数,我们的例子也是 COPY 自 Babel 插件通过秘籍的第一个用例,也推荐详细去学习一下~
1. npm i -g yo generator-babel-plugin-x
2. mkdir babel-plugin-clg-insert-line && cd babel-plugin-clg-insert-line
3. yo babel-plugin-x
4. 补充插件信息:
    ? Plugin Name clg-insert-line
    ? Description
    ? GitHub username or organization
    ? Author's Name
    ? Author's Email
    ? Key your keywords (comma to split)
1. npm i -g yo generator-babel-plugin-x
2. mkdir babel-plugin-clg-insert-line && cd babel-plugin-clg-insert-line
3. yo babel-plugin-x
4. 补充插件信息:
? Plugin Name clg-insert-line
? Description
? GitHub username or organization
? Author's Name
? Author's Email
? Key your keywords (comma to split)执行完上面的步骤后就生成了第一个拥有标准自述文档、测试用例的完整插件项目~
3.1 补充自述文档:
CLI 生成的自述文档包括范例、安装、使用的方式,我们只需要补充需要处理的代码和处理完成后的结果代码~
console.log(1);

function func() {
	console.info(2);
}

export default class Clazz {
	say() {
		console.debug(3);
	}
	render() {
		return <div>{console.error(4)}</div>;
	}
}
console.log(1);
function func() {
console.info(2);
}
export default class Clazz {
say() {
console.debug(3);
}
render() {
return <div>{console.error(4)}</div>;
}
}console.log("line 1", 1);
function func() {
console.info("line 4", 2);
}
export default class Clazz {
say() {
console.debug("line 9", 3);
}
render() {
return <div>{console.error("line 12", 4)}</div>;
}
}console.log("line 1", 1);
function func() {
console.info("line 4", 2);
}
export default class Clazz {
say() {
console.debug("line 9", 3);
}
render() {
return <div>{console.error("line 12", 4)}</div>;
}
}3.2 完善测试用例:
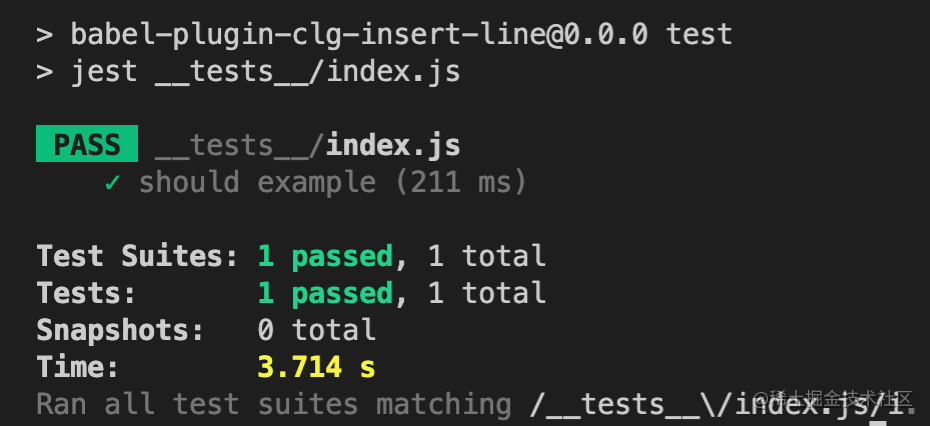
在插件项目的__tests__/fixtures/example目录下生成了第一个测试用例,我们需要完善actual.js和expected.js,其实也是自述文档中补充的两块代码,我们编写后的插件在对actual.js的内容处理后的结果应该和expected.js的内容一致~
3.3 查看 AST 及分析:
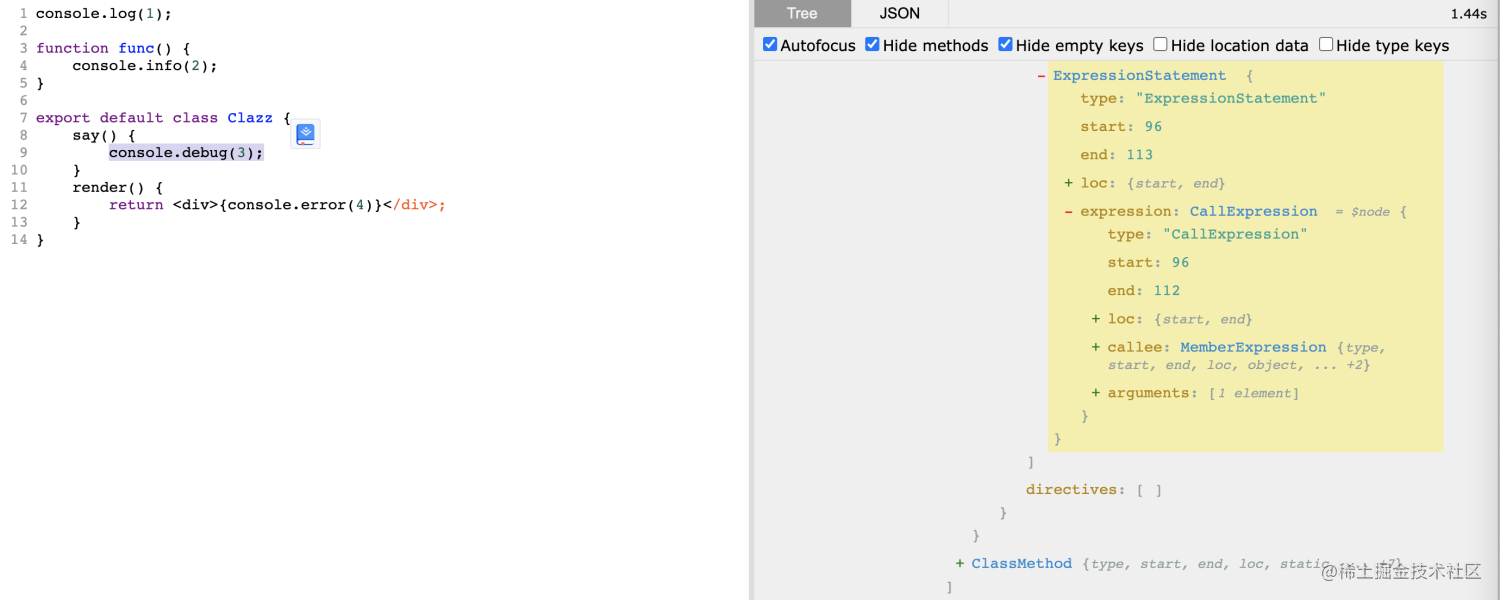
Astexplorer,我们在选中其中一条console语句后右侧窗口高亮了一片 ExpressionStatement 区域,我们需要的是被包裹在里面的调用表达式CallExpression,这CallExpression里面包含被调用表达式(callee) 调用参数(arguments)。

- 通过
callee中包含的信息来判断是否符合我们要处理的位置; - 读取
loc/start/line属性可以得到当前调用表达式所在行号; - 通过向
arguments数组的第一位插入行号来完成目标;
3.4 编写插件部分:
3.4.1 已提供的模板:
在这个插件模板中我们将需要被关注的表达式添加到visitor对象中,当遍历到 AST 为我们关注的表达式时将会被执行,在 t中还包含了很多实用的工具待我们发掘~
export default function({types: t }) {
  return {
    visitor: {

    }
  };
}
export default function({types: t }) {
return {
visitor: {
}
};
}3.4.2 判断是否达到处理的表达式:
- 判断
callee的类型是否符合MemberExpression; - 判断
path.node.callee.object.name是否为console; - 判断
path.node.callee.property.name是否包含'log', 'info', 'error', 'debug';
CallExpression(path) {
  if (t.isMemberExpression(path.node.callee)
      && path.node.callee.object.name === 'console'
      && ['log', 'info', 'error', 'debug'].includes(path.node.callee.property.name)
     ) {
    。。。
  }
}
CallExpression(path) {
if (t.isMemberExpression(path.node.callee)
&& path.node.callee.object.name === 'console'
&& ['log', 'info', 'error', 'debug'].includes(path.node.callee.property.name)
) {
。。。
}
}3.4.3 插入代码行号:
使用t.stringLiteral(`line ${line}`)来实现 AST 对象插入~
const { line } = path.node.loc.start;
path.node.arguments.unshift(t.stringLiteral(`line ${line}`))
const { line } = path.node.loc.start;
path.node.arguments.unshift(t.stringLiteral(`line ${line}`))3.5 完善一处配置和一处更改:
3.5.1 完善配置:
在待处理的源码中涉及到了 jsx 语法的处理,这里需要特殊配置才能支持,我们在调用插件的时候也就是测试用例的 babel 配置中处理就可以~
{
"plugins": [
["../../../src"]
],
// 补充支持 jsx
"parserOpts": {
"plugins": [
"jsx"
]
}
}{
"plugins": [
["../../../src"]
],
// 补充支持 jsx
"parserOpts": {
"plugins": [
"jsx"
]
}
}3.5.2 完善更改:
在transformFileSync执行后会有一些代码风格的差异会影响到测试用例的结果,我们可以replace掉这些空白字符~
expect(actual.trim().replace(/\s/g,"")).toEqual(expected.trim().replace(/\s/g,""));expect(actual.trim().replace(/\s/g,"")).toEqual(expected.trim().replace(/\s/g,""));3.6 执行测试用例:

4. 升级优化插件:
4.1 使用@babel/generator来将 AST 转为 Code:
const generate = require("@babel/generator").default;
export default function ({ types: t }) {
return {
visitor: {
CallExpression(path) {
const calleeName = generate(path.node.callee).code;
consolg.log(calleeName);
}
}
};
}const generate = require("@babel/generator").default;
export default function ({ types: t }) {
return {
visitor: {
CallExpression(path) {
const calleeName = generate(path.node.callee).code;
consolg.log(calleeName);
}
}
};
}4.2 遍历targetCalleeName来优化判断逻辑:
const generate = require("@babel/generator").default;
const targetCalleeName = ['log', 'info', 'error', 'debug'].map(item => `console.${item}`);
export default function ({ types: t }) {
return {
visitor: {
CallExpression(path) {
const calleeName = generate(path.node.callee).code;
if (targetCalleeName.includes(calleeName)) {
const { line } = path.node.loc.start;
path.node.arguments.unshift(t.stringLiteral(`line ${line}`))
}
}
}
};
}const generate = require("@babel/generator").default;
const targetCalleeName = ['log', 'info', 'error', 'debug'].map(item => `console.${item}`);
export default function ({ types: t }) {
return {
visitor: {
CallExpression(path) {
const calleeName = generate(path.node.callee).code;
if (targetCalleeName.includes(calleeName)) {
const { line } = path.node.loc.start;
path.node.arguments.unshift(t.stringLiteral(`line ${line}`))
}
}
}
};
}5. 升级babel-plugin-x:
目前最近的Babel插件版本(v7+)都采用Ts编写,并且风格略有不同,在Ts中使用types相关的API也更加容易上手,所以更新后的Cli将支持这一风格的编写~
6. 总结
通过使用 yo babel-plugin-x 生成的插件模版来快速上手了第一个 babel插件,当你感受到了 babel 的作用后再去了解每个模块的作用,再去拆解每一块的功能也可能会更好~
babel-plugin 源 Cli 插件已经多年不维护了,有个 BUG 的 PR 一直没有合并导致没法使用,所以我推了一个 babel-plugin-x来使用~
 爱学习IT200.cn