CodeGenius 灵活组合的 CLI 工具
TIP
🎄Hi~ 大家好,我是小鑫同学,资深 IT 从业者,InfoQ 的签约作者,擅长前端开发并在这一领域有多年的经验,致力于分享我在技术方面的见解和心得
CodeGenius 是我最近开发的 CLI 工具, 它与你在社区看到的其它 CLI 工具的本质区别是可以 灵活组合 , 这样你既可以为不同的项目组合不同的 CLI 功能, 也可以通过插件开发来替换掉已经过时或不兼容的功能, 灵活组合 对于 CLI 功能较多或项目间应用规则不一致的情况是一个良好的解决方案.
认识 CodeGenius

通过框架图可以了解到, 在 CodeGenius 的核心部分提供了 CLI 命令行注册注册的功能, 还内置了常用的 commit, scrript, fix 命令, 并提供了配置文件的支持, 对于其他额外的功能全部放到插件里面去做, 通过配置文件来进行插件的组合, 形成符合某一个或某一系列项目的 CLI 工具.

CLI 基础功能搭建
这里使用 cac 来作为 CLI 基础功能的搭建, 所有的 CLI 功能全部通过 setup 函数进行注册.
import cac from "cac";

import { handleError, setup } from "@/helper";
import { plugins } from "@/index";

import pkg from "../package.json";

const setupCli = async () => {
  const cli = cac("codeg");

  await setup(cli, plugins);

  cli.help();
  cli.version(pkg.version);

  cli.parse(process.argv, { run: false });

  await cli.runMatchedCommand();
};

setupCli().catch(handleError);
import cac from "cac";
import { handleError, setup } from "@/helper";
import { plugins } from "@/index";
import pkg from "../package.json";
const setupCli = async () => {
const cli = cac("codeg");
await setup(cli, plugins);
cli.help();
cli.version(pkg.version);
cli.parse(process.argv, { run: false });
await cli.runMatchedCommand();
};
setupCli().catch(handleError);由于内置命令和外置命令在自定义配置时略有差别, 所以在 setup 函数中内置的命令需要在此执行并传入自定义配置, rootInstaller 作为特殊的内置命令, 承接着所所有命令通过选项式执行的兜底功能.
export async function setup(cli: CAC, plugins: BuiltInPlugins) {
  const uconfig = await loadConfigModule();
  const commands: Array<CommandOptions> = [];

  const builtInPluginsIns = plugins.map((fn) => fn(uconfig?.commands));

  for (const pluginIns of builtInPluginsIns.concat(uconfig?.plugins || [])) {
    if (pluginIns.command && pluginIns.describe) {
      commands.push({
        display: pluginIns.name || pluginIns.command,
        command: pluginIns.command,
        description: pluginIns.describe,
      });
    }
    pluginIns.setup(cli);
  }
  // 特殊处理
  rootInstaller(commands.concat(defaultCommands)).setup(cli);
}
export async function setup(cli: CAC, plugins: BuiltInPlugins) {
const uconfig = await loadConfigModule();
const commands: Array<CommandOptions> = [];
const builtInPluginsIns = plugins.map((fn) => fn(uconfig?.commands));
for (const pluginIns of builtInPluginsIns.concat(uconfig?.plugins || [])) {
if (pluginIns.command && pluginIns.describe) {
commands.push({
display: pluginIns.name || pluginIns.command,
command: pluginIns.command,
description: pluginIns.describe,
});
}
pluginIns.setup(cli);
}
// 特殊处理
rootInstaller(commands.concat(defaultCommands)).setup(cli);
}自定义配置
自定义配置需要用到的一个关键技术就是 模块动态加载, 目前仅支持加载 codeg.config.js, codeg.config.mjs 文件且必须是 ESM 模块, 如果需要加载更多的模块类型, 还需要额外的兼容.
export async function loadConfigModule(): Promise<
  CodeGeniusOptions | undefined
> {
  let resolvedPath: string | undefined;
  for (const filename of DEFAULT_CONFIG_FILES) {
    const filePath = path.resolve(process.cwd(), filename);
    if (!fs.existsSync(filePath)) continue;
    resolvedPath = filePath;
    break;
  }

  if (!resolvedPath) return;
  const moduleURL = pathToFileURL(resolvedPath).href;
  return (await import(moduleURL)).default;
}
export async function loadConfigModule(): Promise<
CodeGeniusOptions | undefined
> {
let resolvedPath: string | undefined;
for (const filename of DEFAULT_CONFIG_FILES) {
const filePath = path.resolve(process.cwd(), filename);
if (!fs.existsSync(filePath)) continue;
resolvedPath = filePath;
break;
}
if (!resolvedPath) return;
const moduleURL = pathToFileURL(resolvedPath).href;
return (await import(moduleURL)).default;
}同样的我也为自定义配置添加了 defineConfig 函数, 在配置时可以减少一些不必要的麻烦.
export interface CodeGeniusOptions {
  commands?: CommandsOptions;
  plugins?: Plugins;
}

export const defineConfig = (config: CodeGeniusOptions): CodeGeniusOptions =>
  config;
export interface CodeGeniusOptions {
commands?: CommandsOptions;
plugins?: Plugins;
}
export const defineConfig = (config: CodeGeniusOptions): CodeGeniusOptions =>
config;script 命令
script 命令的主要功能是, 代理运行 package.scripts 脚本, 用于项目有大量 scripts 的情况, 可以生成单独的配置文件用来描述每个 script 的作用, 并通过询问模式来执行对应的 script.
export default function scriptRunInstaller() {
  return {
    name: "script",
    describe: "代理运行 package.scripts 脚本",
    command: "script",
    setup: (cli: CAC) => {
      cli
        .command("script", "代理运行 package.scripts 脚本")
        .action(async () => {
          await generateScripts();
          await scriptRun();
        });
    },
  };
}
export default function scriptRunInstaller() {
return {
name: "script",
describe: "代理运行 package.scripts 脚本",
command: "script",
setup: (cli: CAC) => {
cli
.command("script", "代理运行 package.scripts 脚本")
.action(async () => {
await generateScripts();
await scriptRun();
});
},
};
}CodeGenius 插件开发
verify 命令是用来检查 GitCommit 时所编写的描述是否符合规范的功能, 现在我通过 verify 示例来演示 CodeGenius 的插件开发.
注册函数
在 gitCommitVerifyInstaller 函数返回的对象中, name, describe, command, 都是为 root 命令在提供数据, 在这 root 兜底功能中很有必要.
在 setup 函数中通过调用 cac 的 API 来实现 verify 命令的注册, 并在 action 中调用功能函数.
const gitCommitVerifyInstaller = () => {
  return {
    name: "verify",
    describe: "校验 COMMIT_EDITMSG 中的信息是否符合 Angualr 规范",
    command: "verify",
    setup: (cli: CAC) => {
      cli
        .command("verify", "校验 COMMIT_EDITMSG 中的信息是否符合 Angualr 规范")
        .action(async () => {
          await gitCommitVerify();
        });
    },
  };
};
const gitCommitVerifyInstaller = () => {
return {
name: "verify",
describe: "校验 COMMIT_EDITMSG 中的信息是否符合 Angualr 规范",
command: "verify",
setup: (cli: CAC) => {
cli
.command("verify", "校验 COMMIT_EDITMSG 中的信息是否符合 Angualr 规范")
.action(async () => {
await gitCommitVerify();
});
},
};
};功能函数
COMMIT_EDITMSG 是使用 git commit 命令时生成用于存储 git 提交信息的临时文件, 所以读取和校验就变得很简单了.
const gitCommitVerify = async () => {
  const dogit = await execCommand("git", ["rev-parse", "--show-toplevel"]);
  const root = path.join(dogit || "", ".git", "COMMIT_EDITMSG");

  const content = readFileSync(root, { encoding: "utf-8" }).trim();

  const REG_EXP =
    /(?<type>[a-z]+)(\((?<scope>.+)\))?(?<breaking>!)?: (?<description>.+)/i;
  if (!REG_EXP.test(content)) {
    printError(
      "Git 提交信息不符合 Angualr 规范, 建议运行 `npx code-genius commit` 生成规范信息",
    );
    process.exit(1);
  } else {
    printInfo("Git 提交信息校验通过");
  }
};
const gitCommitVerify = async () => {
const dogit = await execCommand("git", ["rev-parse", "--show-toplevel"]);
const root = path.join(dogit || "", ".git", "COMMIT_EDITMSG");
const content = readFileSync(root, { encoding: "utf-8" }).trim();
const REG_EXP =
/(?<type>[a-z]+)(\((?<scope>.+)\))?(?<breaking>!)?: (?<description>.+)/i;
if (!REG_EXP.test(content)) {
printError(
"Git 提交信息不符合 Angualr 规范, 建议运行 `npx code-genius commit` 生成规范信息",
);
process.exit(1);
} else {
printInfo("Git 提交信息校验通过");
}
};接着导出功能函数和注册函数, 以便插件注册和 API 方式调用.
export { gitCommitVerify, gitCommitVerifyInstaller };export { gitCommitVerify, gitCommitVerifyInstaller };CodeGenius 插件使用
在你所需要的用到 verify 命令的项目中安装 code-geniu 和 @codegenius/verify-plugin, 并在项目根目录增夹 codeg.config.mjs 文件, 下面是配置的具体内容.
import { defineConfig } from "code-genius";
import { gitCommitVerifyInstaller } from "@codegenius/verify-plugin";

export default defineConfig({
  plugins: [
    gitCommitVerifyInstaller(),
  ],
});
import { defineConfig } from "code-genius";
import { gitCommitVerifyInstaller } from "@codegenius/verify-plugin";
export default defineConfig({
plugins: [
gitCommitVerifyInstaller(),
],
});配置完成后你就可以通过 codeg 来列出所有已注册命令的选项, 当然你也可以通过 codeg -h 来查看所有已注册的命令.
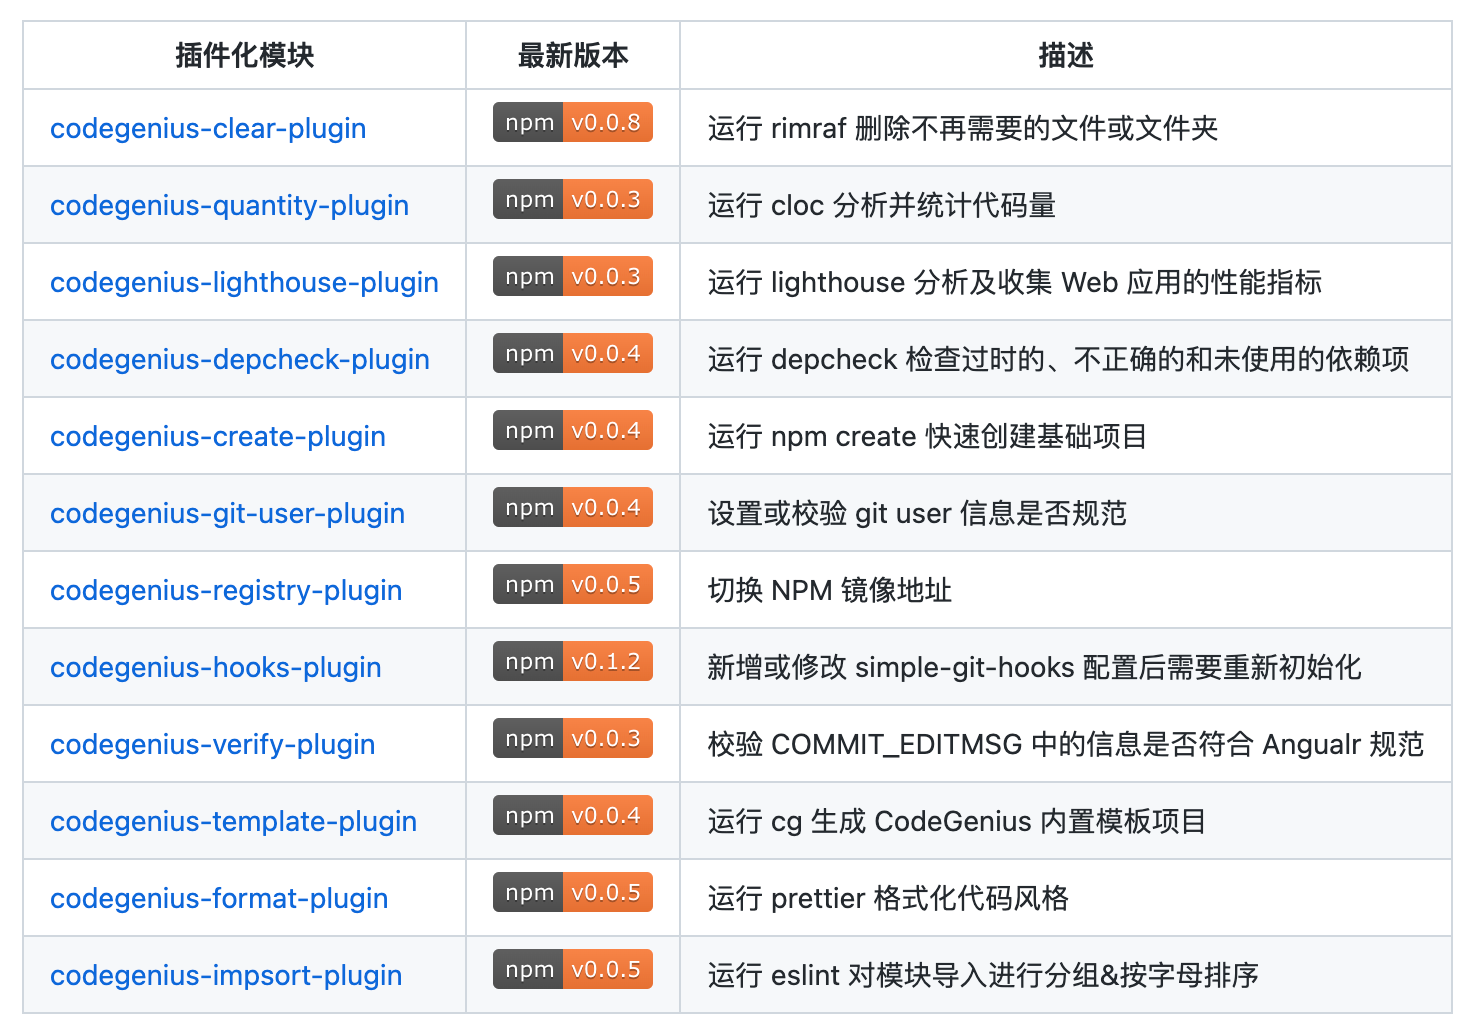
CodeGenius 已有插件

因目前仍集中在调教插件化的核心功能, 上面的插件仅作为参考使用, 更多细节可以在 https://github.com/FE-CodeGenius/ 查看.
 爱学习IT200.cn